Monday, December 31, 2012
New Year's Resolution: More Owls in 2013
Okay, even if they have to be recycled paper owls -- on my refrigerator.
The other recycled paper magnets are from a can of pie cherries. Those paper wrappers can be really pretty.
Happy New Year!
Monday, December 24, 2012
Monday, December 17, 2012
Paper Pear and Partridge
May all your Christmas Days be merry.
Monday, December 10, 2012
Christmas Village of (Milk) Cartons
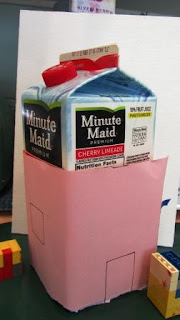
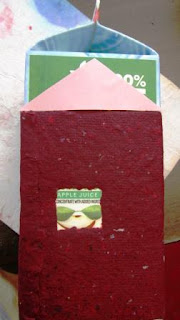
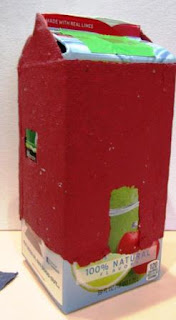
Now that we have covered a milk carton with paper let's slip the paper off and make a house.
I love using both the square bottom section of the carton and the pointy top to make one of these houses. You make these house in three phases. First the walls, then the pointed part of the house above the walls, then the roof.
Start with the walls, doors and windows:
Make enough pulp for at least two 5 X 7 sheets of paper made in the Medium Pour Mold. For basic paper making instructions visit the Arnold Grummer Website. Make the pulp in batches, then combine the batches in a container, that way all the components with be the same color.
 |
| Make a template of the house walls, it will take two sheets of 5 X 7 paper to cover a half gallon carton. Make a seperate template for each sheet of handmade paper |
 |
| Cut out the doors and windows on the template, place it in your frame. Place blocks where the doors and windows will be. REMOVE TEMPLATE, LEAVE THE BLOCKS IN PLACE. |
 |
| Hold the blocks in place while pouring in the pulp. This may require three hands. |
 |
| Drain the paper as usual, leaving the blocks in place. Once drained, remove blocks and sponge and couch as ususal. |
 |
| Wrap the wet sheet around the bottom of the carton. |
Now make the pointed section of the wall:
Try to mimic the angles on the top section of the carton.
Using the pulp painting technique, make the triangle shape with some kind of straight edge. I used a ruler, an extra white grid and a section of paint stirrer. Place these on top of a black screen/ white grid set-up. Pour the same color pulp you used for the walls to make the triangle.
Sponge the triangle, then place it on the carton. Overlap the wall a bit and press the triange and wall sections together where they overlap. Repeat on the opposite wall.
Dry in place.The roof:
When the walls are completly dry, slip a knife between the paper and the carton to gently loosen the house from the carton. Slide the house up the carton until the peak of the triangle section is aligned with the top ridge.
Make the roof with a contrasting color of pulp. Measure the house to see how big a sheet you need for the roof. To make a smaller sheet of paper, use a section of paint stirrer to make a smaller pour mold.
You will want the roof to overhang the house on all four sides.
When the roof is dry, slip the entire house off of the carton. The roof might not stay attachted to the house when you take it off the carton, but you can just set it on top of the walls once it is off the carton.
To make the snowy gingerbread house roof, I added a layer of brown pulp to the white roof.
To get the tile effect, I placed an extra white grid on top of the black screen/white grid set-up used for pulp painting. I poured the pulp into each of the grid squares. Then I placed the wet squares onto the wet white sheet I made for the roof.
Have fun. I would love to see what kind of house you make!
Tuesday, December 4, 2012
Snowfriend
Handmade paper makes the best snowmen. . . and trees. . . and mittens . . .and Christmas cards
Monday, November 26, 2012
A Walk in the Woods Advent Calendar
I made the calendar by layering three kinds of white paper onto a large blue sheet, made in the large pour mold.
 |
| A partial sheet of white paper, made with printed paper makes the snow. |
 |
| White pulp from clean white paper for the three birch trees. |
 |
| For the pine, I made several small sections using the curve in a cookie cutter, then layered the sections to form a tree. |
 |
| For the snow covered pine, I added glitter to whte pulp. |
 |
| I tried to cut around the images, so the doors are not uniforn. |
 |
| The mumbers are made with stamps. |
 |
| I used reduced color copies of artwork for the little picutres. |
Tuesday, November 20, 2012
Wednesday, November 14, 2012
Arnold Grummer Blog Roll -Birch Tree Card
These striking white birch trees are made by layering white paper pulp onto a white sheet of blue handmade paper. I mounted the finished paper onto a green 5 X 7-inch folded card to use as a Christmas card.
To make the blue background I used half a sheet of paper made in a Grummer Medium Pour Mold.
I wanted to work with this half sheet while it was still wet. I also wanted it to have a soft edege on all sides. The pour mold gives the paper this nice edge. To get a smiliar finish on the last side, I tied a ribbon to the the screen and plastic gride before I attached them to the frame.
 |
| ribbon tied on the bottom of screen and grid |
 |
| top |
Once the frame is in place, I poured the blue pulp into the mold, then drained it and sponged it, leaving the ribbon in place. After I very lightly sponged the sheet, I untied the ribbon and slowly pulled it away. Now I have two nicely edged sheets -- for two cards!
 |
| Wet sheet, ribbon still in place |
 |
| I put a screen on either side of the ribbon before I pulled it to keep the paper from tearing. |
 |
| Two sheets! |
For the tree trunks I poured white pulp onto the black mesh screen, placed atop the white plastic grid. To get the right shape, I placed two other plastic grids on top of the black screen and poured the white pulp between them.
 |
| White gride, then black screen, then two more grids as guides for the pulp. |
 |
| Nice straight edges on the trunk |
I lifted the black screen and placed it, pulp side down, on the wet blue sheet. It adhered to the wet sheet after just a bit of sponging.
To make the black lines on the trees, I squirted a thin line of black pulp on the black screen (again, placed atop the white grid) and rolled the pulp with my finger until it was a really thin ribbon. Sticking it on my finger, I placed it gently on the tree trunk.
Repeat, varying the the gap between the two top white grids to make the different sized trees.
When I finished making my birch forest, I placed the blue sheet between two couching sheets and put it in the paper press.
I glued the dry blue sheet to the front of a 5 X 7 inch folded card.
Then I made the other card.
Enjoy and Merry Christmas!
Tuesday, November 13, 2012
Inside Outside Paper Gift Boxes

You know I love to cover everything with newly-made paper. Even more fun is the un-covering. Handmade paper holds its shape beautifully. Here I've covered the insides and the outsides of several straight sided containers to make little lidded boxes. Enjoy!
 |
It takes about two small sheets of newly made paper (I use the medium pour mold) to cover one of these boxes. For the round canisters, I used a 28 ounce can, for the square boxes a half-gallon juice carton.
The wetter the paper, the better it will adhere to the container and to other sheets of paper.
Inside
For the round canister, start by makig a disc of pulp that will act as the bottom of the "inside" canister. Make the disc by using a second 28 ounce can that has both ends removed. Place the can on the black screen, set on top of the large white plastic pour mold grid, place all of this on a tray. Pour the pulp into the can, remove the can and sponge the pulp disc. Set aside.
Make two sheets of paper using the medium pour mold. Since you want both sheets to be the same color, mix the pulp in two batches, but combine them in one pitcher, then pour half the pulp for each sheet.
Make a fold on the long edge of the wet sheet, about half an inch, then loosely roll the sheet and put it into the inside of the can with the folded lip on the bottom edge, where the side meets the bottom. Once you have the sheet in place on the side of the can, unfold the half-inch lip, so that it is on the bottom of the can.
Take the second sheet of paper and see how much you will need to cover the rest of the side of the can. Gently tear off the right size piece, fold the bottom of the sheet, like the first sheet. Place the second sheet inside the can, unfolding the bottom edge. Made sure the sheets overlap and press them firmly tother, so that they adhere to eachother and form one peice.
Now take the disc of pulp and place it in the bottom of the can. Press it firmly into the little folded edges that are under it.
Let the paper dry completely. It might take all day. Take a long, thin knife or spatula and unstick the paper from the can. Make sure you reach all the way to the bottom. Gently tease the paper canister out of the can by pressing your thumbs on the inside of the can and your fingers on the outside and pushing the paper upward. If you try to grip the top of the paper and pull it out, it will rip.
Outside
Once you have removed the "inside" of the canister, cover the outside using the same technique of folding up about a half inch of the sheet of paper, wrapping the sheet around the outside of the can, then unfolding the half-inch lip onto the bottom of the can. Again, tear off enough of a second sheet of paper to complete the wrap. Make another disc of paper pulp and place it on the bottom of the can, pressing it firmly into the little edges that you folded out onto the bottom.
When the paper is dry, run a knife or thin spatula between the paper and the can. Gently push the paper upward untill it slides off the can.
Squares
The square boxes are made the same way. Instead of a pouring pulp into a can and making a disc, you can tear a square of paper from the wet sheet. Make it slightly smaller than the bottom of the box.
To make that cut-out shapes in the box lids, place a "block" in the pour mold before pouing in the pulp. Leave it there while you drain the pulp and do the initial sponging. For the Christmas Tree and the leaf cut-outs, I used cookie cutters for the block. For the circles, I used coins.
 |
| Place a "block" in the pour mold to make a cut-out. |
 |
| Leave the block in place while you drain and sponge the sheet. |
 |
| Voila! A cut-out. |
Now for the best part. What to put inside. I vote for truffles.
Subscribe to:
Comments (Atom)


.JPG)


